
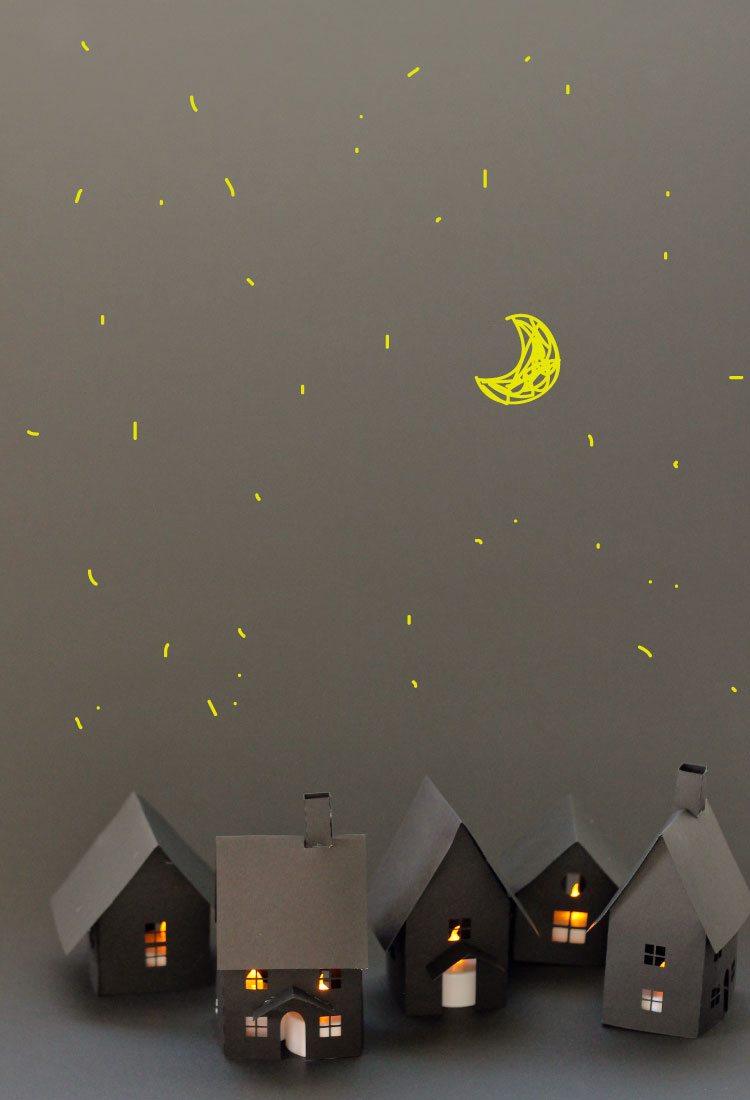
The spookiest season is upon us, and what better way to celebrate than to create an eerie and unnerving feeling in your home. All these Halloween décor ideas are fairly straightforward and shouldn’t break the bank. So, dig out your scissors and glue, stick hocus pocus on the tv, and create a haunting hollow to leave the trick or treaters screaming.
Easy Wool Pumpkins
These cute pumpkins can be made in under 30 minutes, and you can use different coloured wool to match your décor.
What you’ll need
- Plastic bag / bubble wrap
- Masking tape
- Scissors
- Pencil / knitting needle
- A twig
- Wool
Instructions
- Get your plastic bag and wrap it tightly around your pencil to make a pumpkin shape. Use a little of the masking tape to allow it to keep its shape. Multiple bags can be used for a bigger pumpkin.
- Measure about 2 ½ meters of wool, take both ends and straighten, so you’ve got double thickness.
- Tie the looped end of the wool to the tip of the pencil. Secure the other end of the wool to the bottom of your plastic bag pumpkin with a little masking tape. Then pull the wool through the hole in the middle of the pumpkin using your pencil.
- Continue threading the wool through the middle of the pumpkin with your pencil so you are covering the plastic bag – you may want to continue for a few layers.
- Once fully covered cut off any excess wool and secure the end by tucking it under the tightened wool.
- Cut a twig about 10cm in length and push it into the centre of your pumpkin.
- Create multiple pumpkins in various sizes and colours and place them around your home in small batches. They can be re-used year after year, just replace the twig.
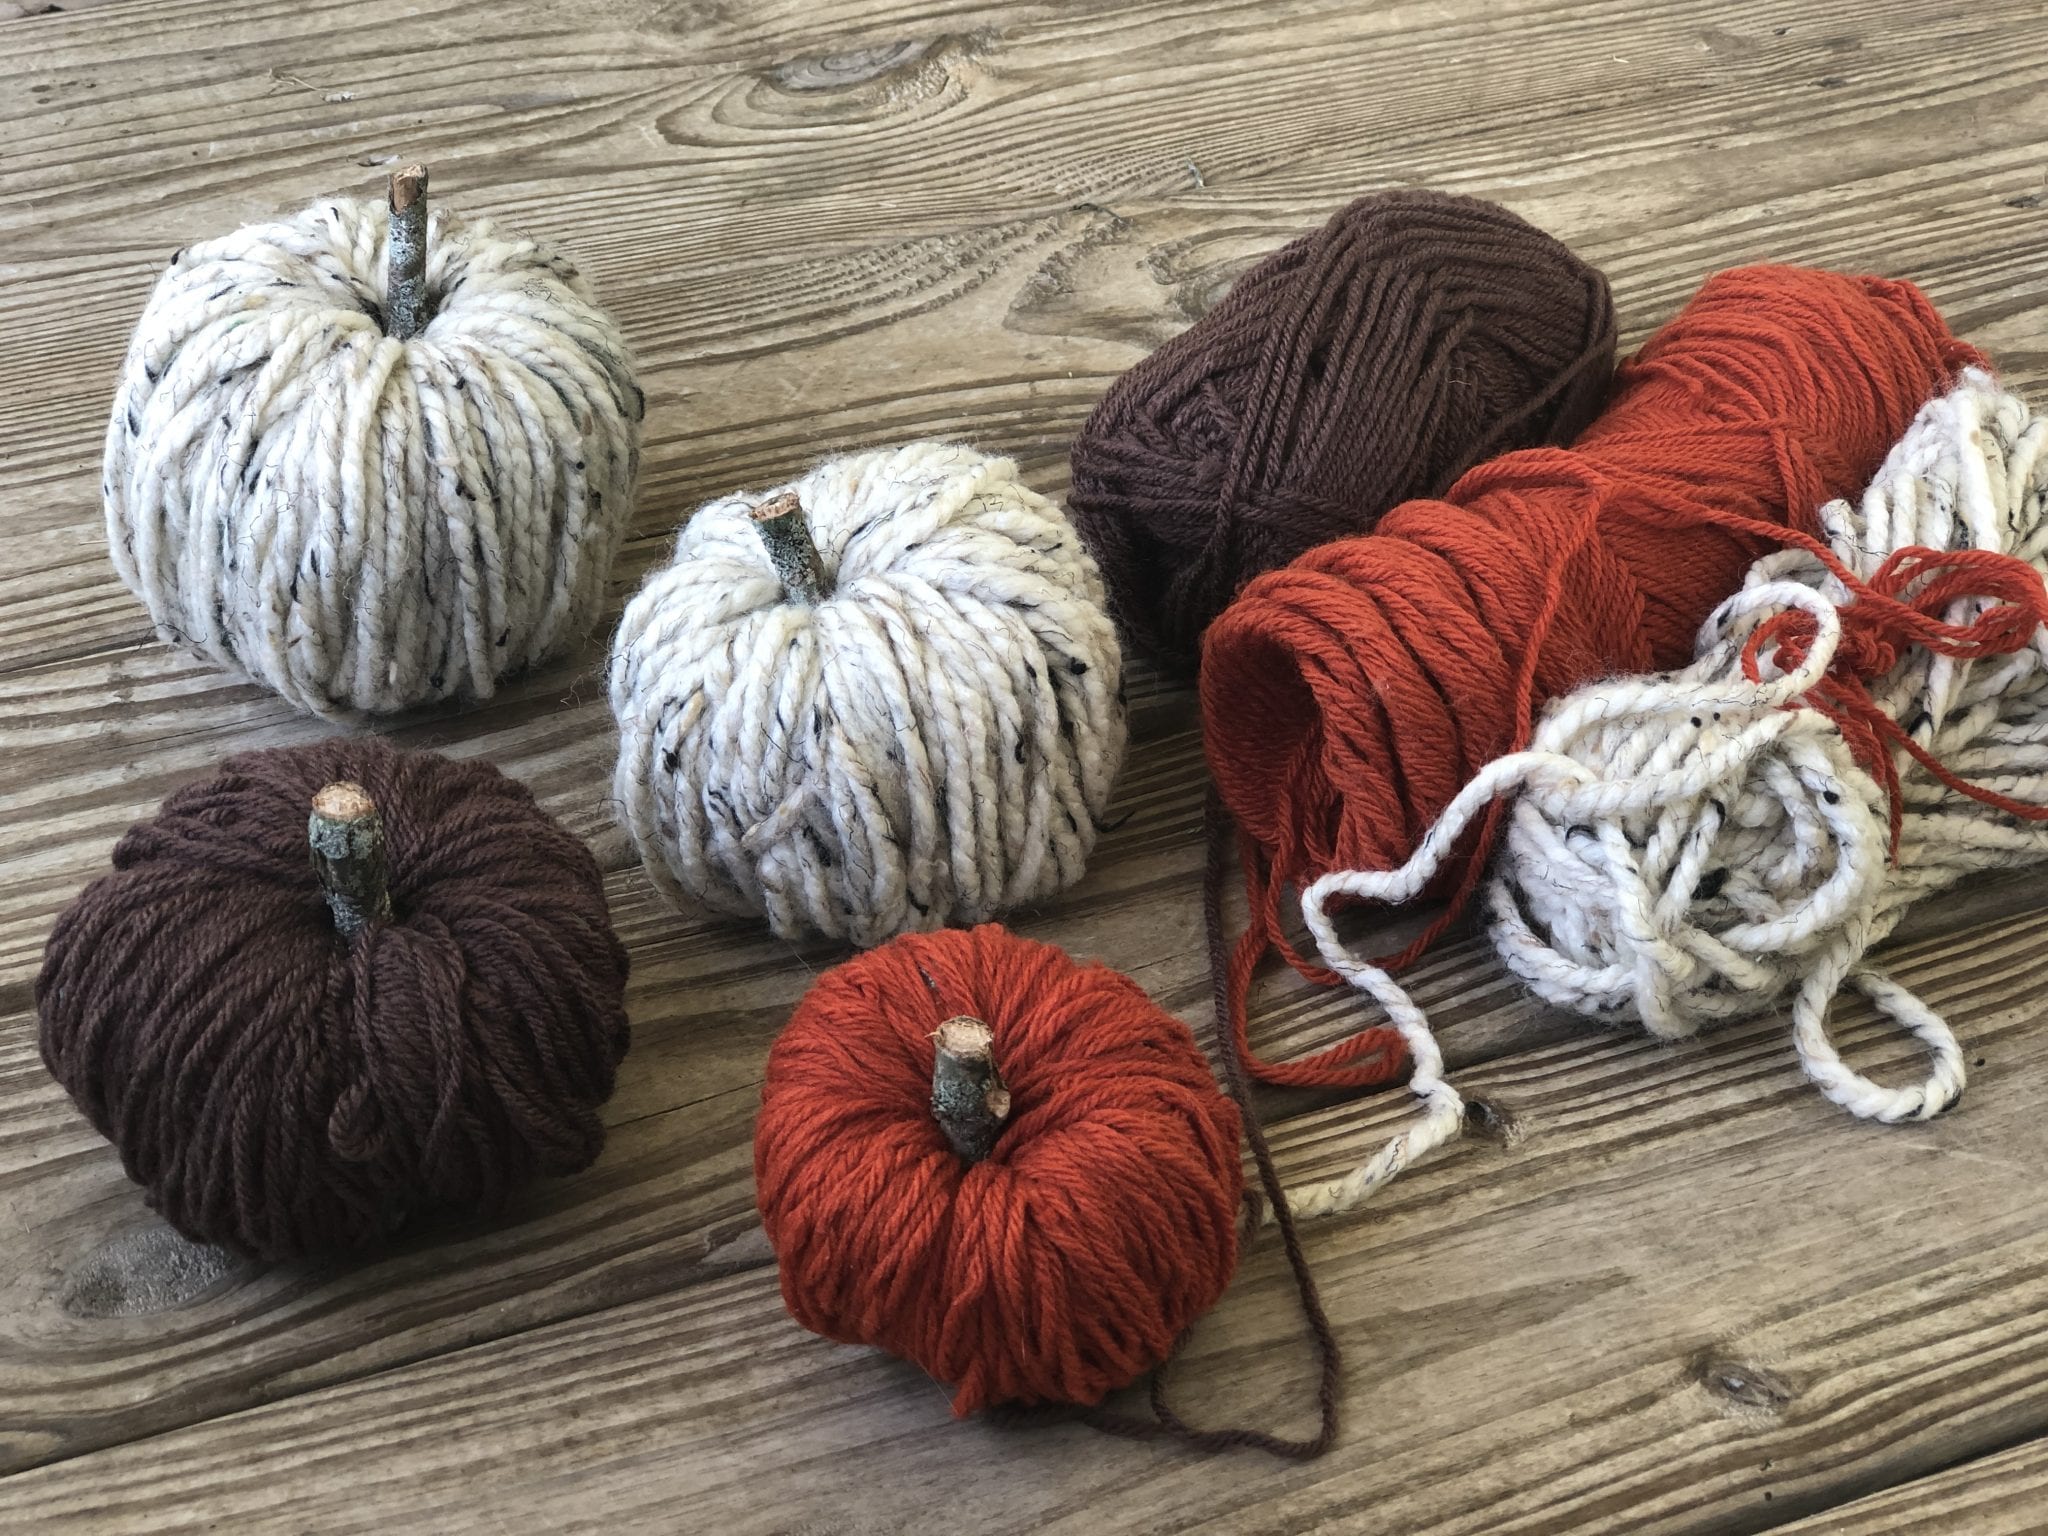
Photo Credit - https://hobbiesonabudget.com/easy-diy-yarn-pumpkins/
Dramatic Black Branches
Adding a touch of class to any Halloween themed décor are these black branches that can be used in a variety of different ways – hang from the ceiling, place in a vase, or use as a table centrepiece.
What you’ll need
- Black spray paint
- A good base branch (at least 1cm in thickness)
- Thinner twigs that will wrap around your base branch (preferably with leaves)
- Any other foliage/flowers you would like to incorporate
Instructions
- Start off with your base branch and cut it to your preferred size/shape.
- Add the smaller twigs, by wrapping them around the base branch and securing them with string. There are no set rules, experiment until you think it looks good.
- Add the flowers and foliage, and secure them with more string if necessary
- Finally, the dirty bit – place your design on some newspaper and spray it using the black paint. Ensure your space is fully covered with newspaper to avoid black paint getting where you don’t want it.
- Let your design dry and hang/place/display wherever you want to add a spot of spook to your home.
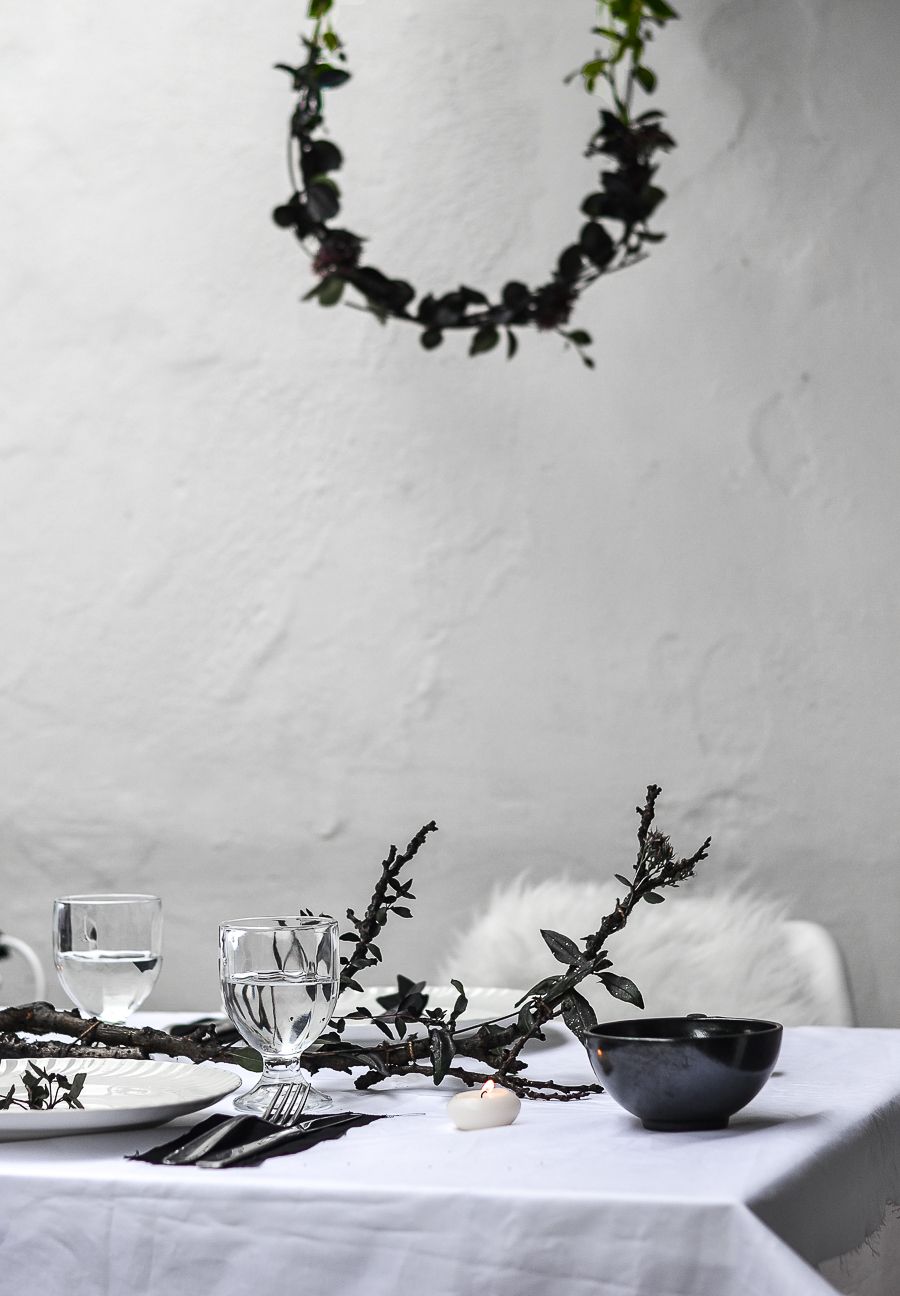
Photo - https://www.homedit.com/halloween-table-centerpiece/
Spooky Embroidery Hoop Spider Web
An easy, fairly cheap way to create a nightmare for your arachnophobia friends. You can also paint the hoop black if it better matches your décor.
What you’ll need
- An embroidery hoop
- Stretchy spider web
- Small fake spiders
- White string or wool
Instructions
- Take your embroidery hoop and unscrew it so it’s in the 2 separate pieces.
- Stretch out your spider web over the smaller hoop and rearrange until you are happy with how it looks.
- Place the bigger hoop over the smaller hoop so it is on top of the spiderweb and tighten the screw.
- Use your scissors to cut off the excess spiderweb and tuck in the edges so it adheres to itself.
- Cut your white string or wool and tie it to the hoop so you can hang it to a place of your choosing.
- Once hung, add in your fake spiders - et voila!
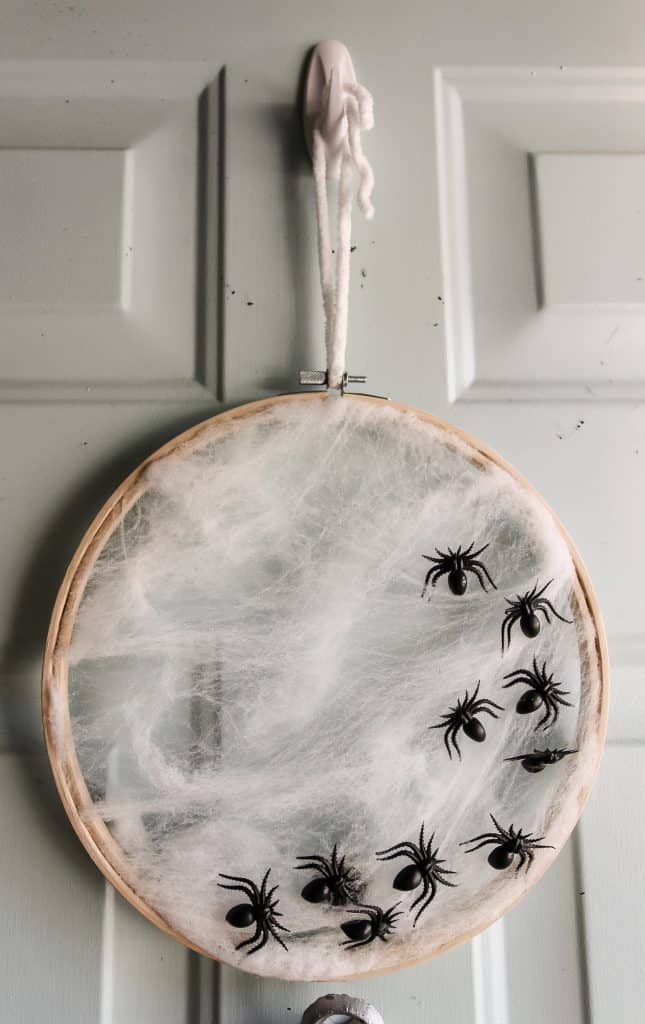
Photo - https://www.charlestoncrafted.com/how-to-make-an-embroidery-hoop-spiderweb-wreath/
Gothic Cupcake Casing Pumpkins
These simple pumpkins create a stylish gothic look. If you’re feeling creative feel free to mix and match patterns, colours and folds. For an even speedier version purchase black cupcake casings rather than painting them.
What you’ll need
- A Pumpkin
- Cupcake casings
- Matte black paint / spray paint (+ a brush if using paint)
- Glue
- Double-sided tape
Instructions
- First things first, you will need to fold your cupcake casings in half, and secure with a little glue. Try to do this near the base of the fold so the case still has a little volume.
- Then in a newspaper covered area, paint/spray your cupcake casings black and leave to dry. If you wanted to do a pattern on the pumpkin leave some white. (We will just be instructing on a fully black version)
- Take your first casing and place a small bit of double-sided tape on the back. Place this vertically as close to the top of the pumpkin as possible and stick down.
- Repeat with your next casing underneath the first, going down in a vertical line, and overlapping about 1cm.
- Once you’ve done your first line, start at the top again on your next line. Place this casing so it is sitting on top of your first casing, covering about ½ of the case, leaving the rounded, perforated edge showing.
- Continue round your pumpkin until it is fully covered.
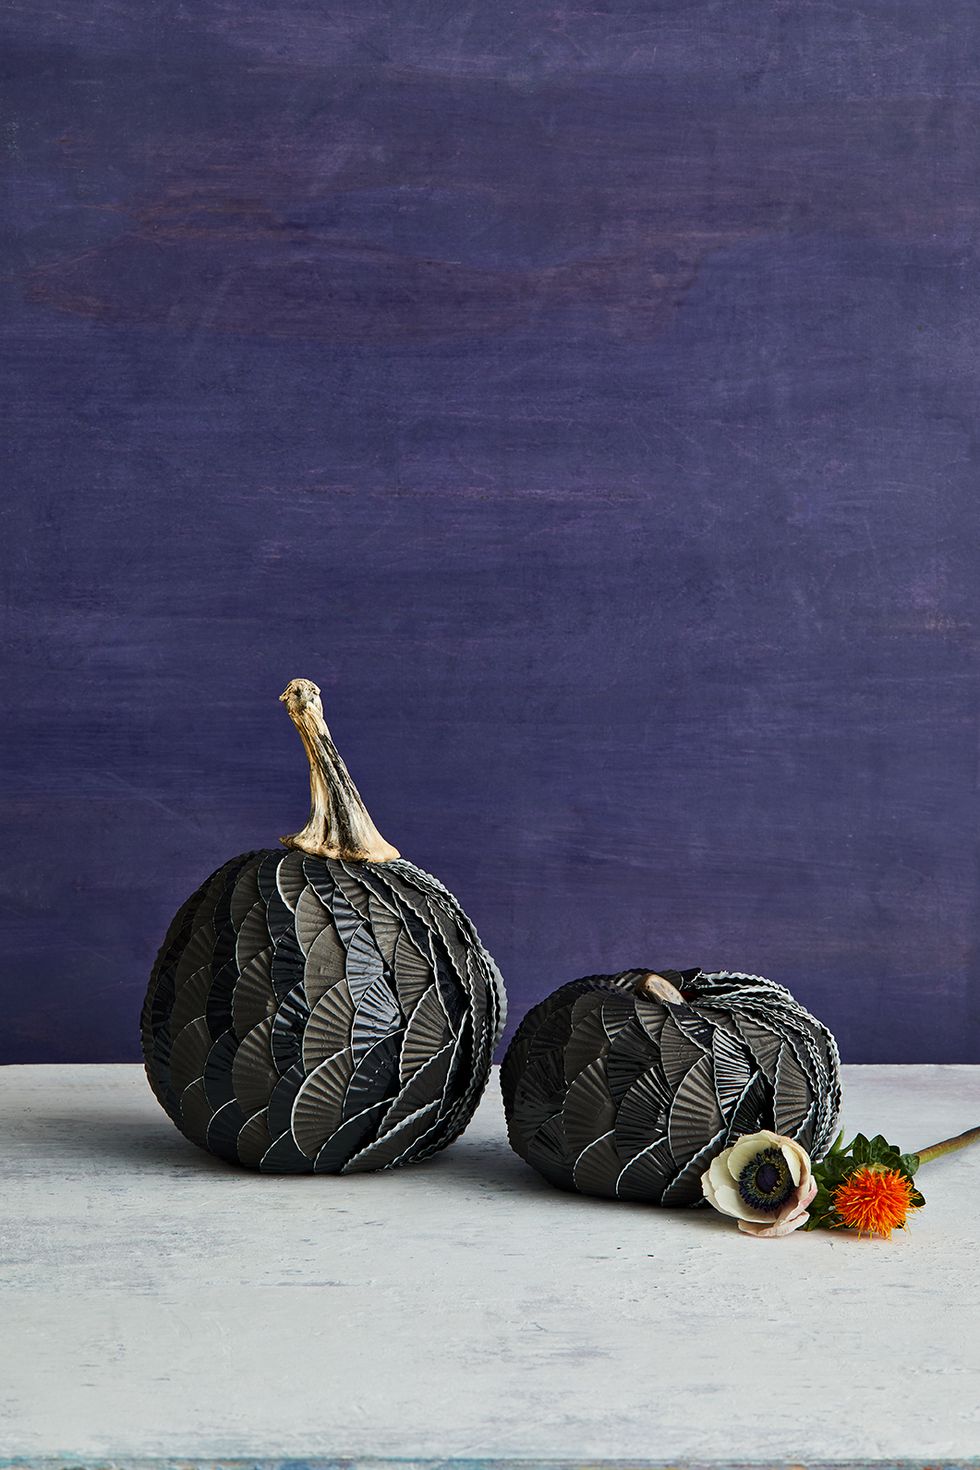
Photo - https://www.goodhousekeeping.com/holidays/halloween-ideas/g421/halloween-decorating-ideas/?slide=2
Ghostly Tulle Balloons
Easy, chic and gives you that ghostly feeling, these balloons are sure to start your Halloween off with a bang!
What you’ll need
- Clear, white or black helium balloons
- Black tulle
- Black ribbon
Instructions
- Hold you balloon on top of your tulle so you can roughly measure how much is needed to cover the balloon. Then cut the tulle out to the required size, in a square shape.
- Replace the balloon in the centre of your tulle square, tie-side up, and gather the edges of tulle to the top end of your balloon.
- Secure your tulle to the balloon by wrapping the black ribbon around and knotting off. Leave a tail to your ribbon to your desired length and cut off the remains.
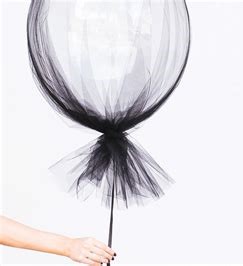
Photo - https://www.childmags.com.au/diy-tulle-covered-balloons/
Sinister Bat Napkins
Or as I have deemed them – Batkins. The perfect addition to your dining table for Halloween night. Try to keep your folds as evenly and symmetrical as possible.
What you’ll need
- Black square Napkins
Instructions
- Layout your napkin wrong side up (if your napkin has a wrong/right side), so the top corner is facing north.
- Fold your napkin in half by bringing the south corner up to meet the north corner. You will end up with an equilateral triangle shape.
- Fold the napkin in half again by bringing the east corner over to meet the west corner. You will end up with an isosceles triangle shape.
- Turn your napkin so the 90° angle is facing downwards – the long side of the triangle should be the flat top edge.
- At about halfway down horizontally, fold the bottom 90° angle up and over the top edge of the napkin so about 5cm is overlapping leaving a small point at the top. This will become the bat's head.
- Next, hold your finger at the middle point on the bottom edge of the napkin and fold the right side up at a 45° angle to make one bat wing.
- Repeat the same on the left-hand side and press down to keep all the folds in place.
- Fold the top middle point of your bats head (the top point), over about 2cm, so it folds underneath the rest of your batkin – keep this fold loose.
- Finally press vertically down with your fingernail on this top fold to make a little indent and give them impression of ears.
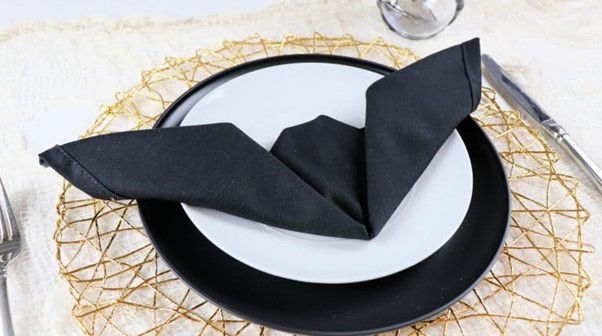
Photo - https://www.creativeramblingsblog.com/how-to-fold-a-bat-napkin/
Deadly Mummy Jars
These jars are super simple and surprisingly effective. Feel free to use any jar that you have lying around to represents mummies of all size and shape.
What you’ll need
- Glass Jar
- White tape of your choice – masking, electrical, etc.
- Scissors
- Candle
- Googley eyes
- Glue
Instructions
- Start with your clean jar and stick on your googley eyes about halfway down, with the glue.
- Get your tape and starting from the bottom of your jar start wrapping it round. It doesn’t have to be perfect and looks better if it overlaps a little in places.
- When wrapping avoid the eyes, leaving a small portion of the glass showing at the front for the eyes. Cut the end of your tape when finished.
- Leave to dry and place your candle inside, ready to light on Halloween night.
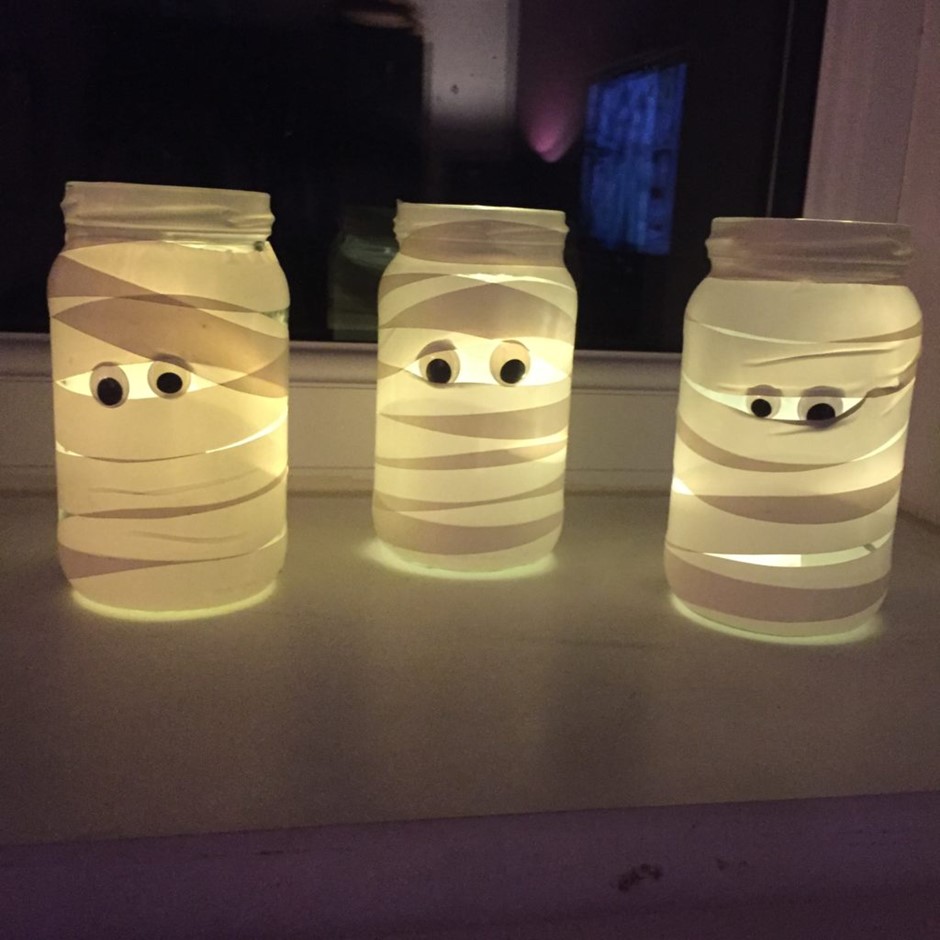
Photo - https://blissfuldomestication.com/mummy-jam-jar-laterns/
Creepy Pipe Cleaner Spiders
At first glance these fuzzy little creepy crawlies look realistic enough to give anyone a freight. Get creative with how you display your spiders – create a decorative garland, hang from the staircase, or in a doorway, leave under an unassuming family members duvet...
What you’ll need
- Black pipe cleaners (4 per spider)
- Twine
- A large needle
Instructions
- Take 4 pipe cleaners and stack them in your hand so they are roughly at the same height.
- Fold all the pipe cleaners in half.
- Take the top of the folded pipe cleaners (at the fold), bend it over about 2cm and twist the pipe cleaners together. This forms the body of the spider.
- Separate the legs out so they’re each at the your chosen angle, and then put 1 or 2 bends in each leg. The number of bends does not have to be consistent for all the legs.
- Decide how you are going to hang your spiders and cut the correct length of twine.
- Thread your needle with the twine and push it through the body of your spider. You may need to scrunch the body of your spider a bit tighter to get it to stay in the correct position.
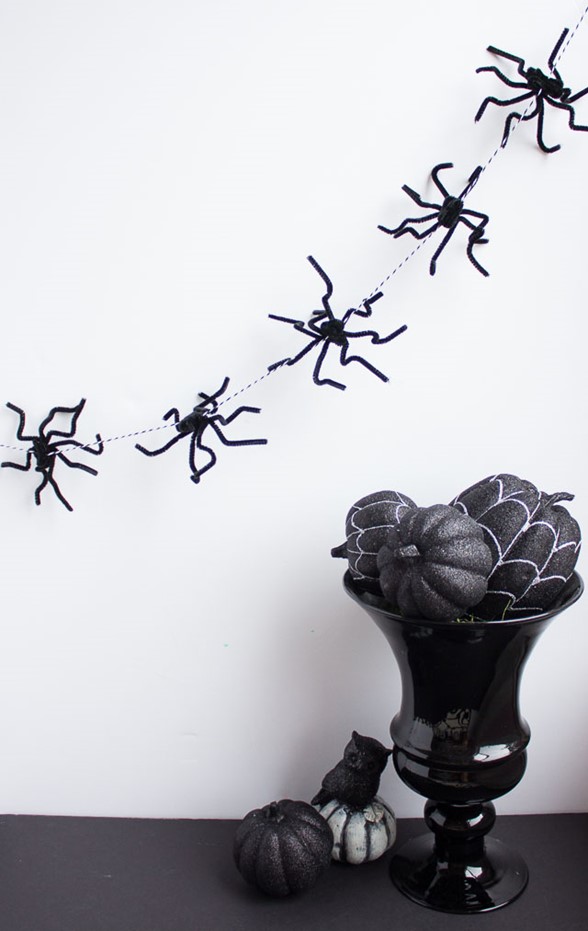
Photo – https://designimprovised.com/2014/09/halloween-spider-garland.html
Floating Candles
It doesn’t take too much time to whip up these wonderfully enchanting floating candles. Fool your friends into thinking you’ve channelled your inner Hermione Granger and seemingly bewitched your candles to suspend in thin air - its leviosaaar!
What you’ll need
- Empty toilet/kitchen rolls
- White paint
- Hot glue gun (& glue sticks)
- Paint brush
- Fishing wire
- A needle
- Scissors
- Battery-powered tea light candles
- Thumbtacks
Instructions
- Plug in you hot glue gun and allow it to warm up. Once it’s warmed up, apply hot glue around the circular top rim of each tube, allowing the glue to drip so it looks wax-like. Be generous with the amount of glue you use and leave to dry.
- Once dried, paint each tube, including the glue drips, in your white paint. Apply a little paint to the inside of the tube, so when they’re hanging it doesn’t ruin the effect. Apply as many coats as necessary and again, leave to dry. Choosing a slightly off-white colour gives the best effect.
- Decide how far down you would like your tealights to sit (about 2-5 cm below the top of your candle), and poke 4 holes directly across from each other with your needle.
- Thread your needle with the fishing wire and weave it through one hole and out the opposite side, then cut it and tie off the ends with a simple knot. The length of each string will depend on how high or low you would like to hang your candles.
- Repeat through your empty holes so that the fishing wire is creating a cross on the inside of the roll, and tie in place.
- Place your tealight into the top of the roll and allow it to sit on the fishing wire.
- Hang your candles from the ceiling using a thumbtack to hold it in place.
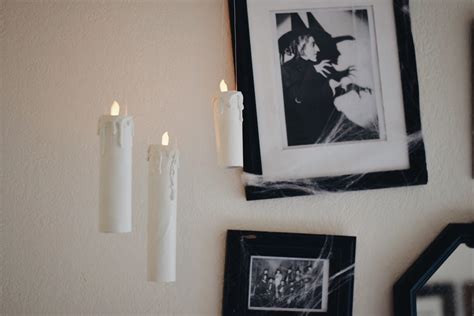
Photo – http://twopepers.com/2016/10/diy-harry-potter-floating-candles/
Ghostly Garland
Take your favourite horror book out the freezer (little women anyone?) and rip out the pages to create this ghoulish garland.
What you’ll need
- Book pages, or white paper
- Pen/Pencil
- Scissors
- Hole punch
- String
- Mini pegs
Instructions
- Use your pen/pencil to draw a ghost on a sheet of your book and cut it out so this can become your stencil – ghosts come in all different shapes and sizes so don’t worry about being too regimented.
- Stack a few pages and then place your stencil on top. Cut round your stencil so you now have multiple ghosts cut out. Repeat until you have enough to fil your garland.
- One by one, use your hole punch to create the eyes for each ghost. Use your artistic licence to give your ghosts a bit of character, and make it so they seem to be looking in different directions
- Cut your length of string and clip each ghost using the mini-clothes pegs.
- Hang your tort of ghosts and enjoy!
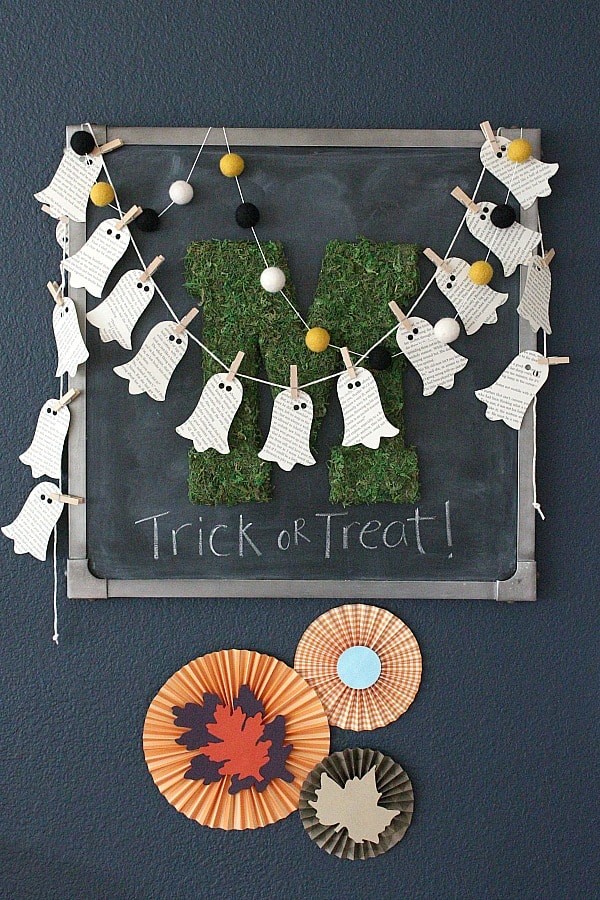
Photo – https://thistlekeylane.com/diy-book-page-ghost-garland/#more-12395


